Have you ever worked on a project that was so unwieldy, you were scared to update a file or add a feature? Maybe the problem was that you weren’t using a version control system. In today’s tutorial, we’ll learn the basics of what might possibly be the best VCS in the world: Git.
What is Git?
Git is a open-source code managemen tool; it was created by Linus Torvalds when he was building the Linux kernel. Because of those roots, it needed to be really fast; that it is, and easy to get the hang of as well. Git allows you to work on your code with the peace of mind that everything you do is reversible. It makes it easy to experiment with new ideas in a project and not worry about breaking anything. The Git Parable, by Tom Preston-Werner, is a great introduction to the terms and ideas behind Git.
Why Should I use Git?
You should definitely use a revision control system; as we already said, this gives you the freedom to do whatever you want with your code and not worry about breaking it. So if you’ve realized the benefits of using a revision control system, why should you use git? Why not SVN or Perforce or another one? To be honest, I haven’t studied the differences too closely; check out WhyGitIsBetterThanX.com for some helpful info.
How do I Get Set Up?
Git is pretty easy to get: on a Mac, it’s probably easiest to use the git-osx-installer. If you have MacPortsinstalled, you may want to get Git through it; you can find instructions on the GitHub help site. (And yes, we’ll talk about GitHub). On Windows, the simplest way to start rolling is to use the msysgit installer. However, if you’ve got Cygwin, you can git Git through there as well.
How do I use Git?
By now you should have Git installed; if you’re on a Mac, open up a terminal; if you’re on Windows open the Git Bash (from msysgit) or your Cygwin prompt. From here on, there shouldn’t be any OS differences.
Configuration
We’ll start by doing a bit of configuration. Every commit you make will have your name and email address to identify the ‘owner’ of the commit, so you should start by giving it those values. To do so, run these commands:
- git config –global user.name "Your Name"
- git config –global user.email "your@email.com"
It’s also nice to enable some text coloring, just for easier reading in the terminal.
- git config –global color.diff auto
- git config –global color.status auto
- git config –global color.branch auto
git init
Now that Git knows who you are, let’s imagine we’re creating a simple PHP web app. (Of course, the bigger the project, the brighter Git shines, but we’re just learning the tools, right?) We’ve got an empty directory called ‘mySite.’ First focus on that directory (using the cd command). To get started with Git, you need to run the git init command; as you might guess, this initializes a Git repository in that folder, adding a .git folder within it. A repository is kind of like a code history book. It will hold all the past versions of your code, as well as the current one.
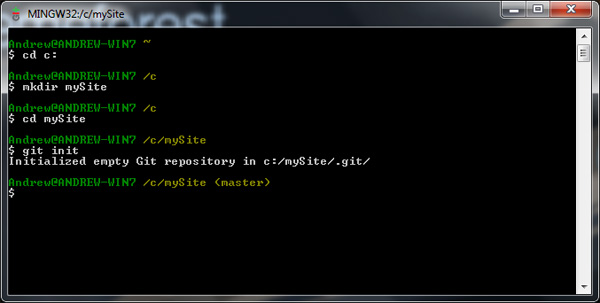
Notice that your terminal path is appended with (master). That’s the branch you’re currently working on. Branch? Think of your project as a tree; you can create different features on different branches, and everything will stay separate and safe.
git add
We’ve started working on our application.

Before we go any further, we should make our first commit. A commit is simply a pointer to a spot on your code history. Before we can do that, however, we need to move any files we want to be a part of this commit to the staging area. The staging area is a spot to hold files for your next commit; maybe you don’t want to commit all your current changes, so you put some in the staging area. We can do that by using the add command
- git add .
The . simply means to add everything. You could be more specific if you wanted.
- git add *.js
- git add index.php
git commit
Now that we’ve staged our files, let’s commit them. This is done with the command
- git commit
This takes all the files in our staging area and marks that code as a point in our project’s history. If you don’t add any options to the command above, you’ll get something like this.
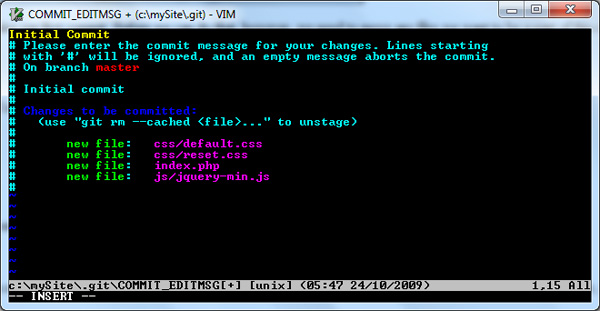
Each commit should have an accompanying message, so you know why that code was committed. This editor allows you to write your message, as well as see what is in this commit. From the image above, you can see that this commit is comprised of four new files. The editor you’re using to write the message is Vim; if you’re not familiar with vim, know that you’ll need to press i (for Insert) before you can type your message. In the shot above, I’ve added the message “Initial Commit.” After you write your message, hit escape and type :wq (to save and exit). You’ll then see you’re commit take place.
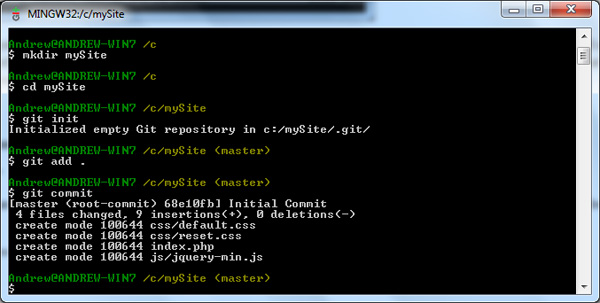
You can use a few options to make commits more quickly. Firstly, -m allows you to add your message in-line.
- git commit -m "initial commit"
Then, -a allows you to skip the staging area; well, not really. Git will automatically stage and commit all modified files when you use this option. (remember, it won’t add any new files). Together, you could use these commands like this:
- git commit -am ‘update to index.php’
So how does Git tell commits apart? Instead of numbering them, Git uses the code contents of the commit to create a 40 character SHA1 hash. The neat part about this is that, since it’s using the code to create the hash, no two hashes in your project will be the same unless the code in the commits is identical.
git status
The git status command allows you to see the current state of your code. We’ve just done a commit, so git status will show us that there’s nothing new.

If we continue working on our imaginary project, you’ll see that our status changes. I’m going to edit our index.php and add another file. Now, running git status gives us this:

The update is divided into two categories: “changed but not updated,” and “untracked files.” If we run
- git add userAuthentication.php
- git status
you’ll see that we now have a “changes to be committed” section. This lists files added to the staging area. I’m going to commit these changes with this:
- git commit -am ‘user authentication code added’
Now running git status shows us a clean working directory.
git branch / git checkout
Here’s a scenario: we’re working happily on our project when suddenly we have a grand idea. This idea is so revolutionary, it will change our project drastically. We’ve got to give it a try, but we don’t want to throw this insecure, first-draft code in with our tested and true code. What to do? This is where git branch will be immensely helpful. Let’s branch our project so that if our big idea doesn’t work out, there’s no harm done.
- git branch
Just running the branch command sans options will list our branches; right now, we’ve only got the master branch, which is what any git repository starts with. To actually create a new branch, add the name of your new branch after the command.
- git branch bigIdea
When you create a new branch, you aren’t switched to it automatically. Notice that our terminal still says (master). This is where we use branches comrade command git checkout.
- git checkout bigIdea
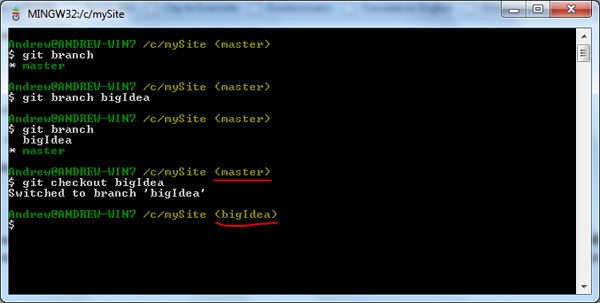
(Tip: you can create a branch and switch to it in one fell swoop with this command: git checkout -b branch name.) As you can see, we’re now on the bigIdea branch. Let’s code up a storm. Git status will show our work.

Let’s commit our changes:
- git add .
- git commit -m ‘The Kiler Feature added’
All right, enough of this feature for now; let’s go back to our master branch; but before we do, I want to show you our current project folder.

Now, switch back to the master branch; you know how:git checkout master. Look at our project folder again.

No, I didn’t do anything; those two files are only part of the bigIdea branch, so we don’t even know they exist from the master branch. This not only works for complete files, but also for even the smallest changes within files.
git merge
Ok, so we’ve been working hard on that bigIdea branch in our spare time. In fact, after another commit, it’s looking so sweet we’ve decided it’s good enough to join the master branch. So how do we do it?
The git merge command is made for exactly this purpose. While on the master branch, give this a try:
- git merge bigIdea
It’s that easy; now, everything on the bigIdea branch is a part of the master branch. You can get rid of the bigIdea branch now, if you want.
- git branch -d bigIdea
I should mention that if you haven’t merged a branch, Git won’t let you delete it with this command; you’ll need to use an uppercase D in the option. This is just a safety measure.
git log / gitk
You’ll probably want to look at your commit history at some point during your project. This can easily be done with the log command.
- git log
This will output a list of all the commits you’ve made in a project, showing them in reverse order. You can get at quite a tidy chunk of info here:
- the commit author
- the commit hash
- the date and time
- the message

Definitely informative, but rather dry, no? We can brighten things a bit with the graph option.
- git log –graph

Now we can see the tree structure, sort of. Although we don’t get their names, we can see each of the branches and which commits were made on them. If you’re used to working in a terminal, you might be fine with this. However, if (previous to this experience) the word terminal strikes you first as something deadly, breathe easy: there’s an app for that. Try this:
- gitk –all

This is the graphical repository browser. You can browse around your commits, see exactly what was changed in each file during a commit, and so much more. (You’ll notice I added a few commits before merging, just to make the tree structure more recognizable.)
GitHub
Now that you’ve got a reasonable knowledge of Git under your belt, let’s look at some of the collaborative parts of Git. Git is a great way to share code with others and work on projects together. There are a number of Git repository hosting sites. We’ll just look at one: GitHub.


Head over to the GitHub sign-up page and create an account. You’ll need an SSH public key, so let’s create that right now! (Note: you don’t need the key while signing up; you can add it later.)
Open up your terminal and type this:
- ssh-keygen -t rsa -C "your@email.com"

The t option assigns a type, and the C option adds a comment, traditionally your email address. You’ll then be asked where to save the key; just hitting enter will do (that saves the file to the default location). Then, enter a pass-phrase, twice. Now you have a key; let’s give it to GitHub.
First, get your key from the file; the terminal will have told you where the key was stored; open the file, copy the key (be careful not to add any newlines or white-space). Open your GitHub account page, scroll to SSH Public Keys, and click “Add another public key.” Paste in your key and save it. You’re good to go! You can test your authentication by running this:
- ssh git@github.com
You’ll be prompted for your pass-phrase; to avoid having to type this every time you connect to GitHub, you can automate this. I could tell you how to do this, but I’d probably inadvertently plagiarize: the GitHub Help has a plain-english article on how to do it.
Git Clone
So now you’re set up with GitHub; let’s grab a project. How about jQuery? If you go to the jQuery GitHub project, you’ll find the git clone URL. Run this:
- git clone git://github.com/jquery/jquery.git

This creates a jquery folder and copies the whole jquery repository to your computer. Now you have a complete history of the project; check it out with gitk –all.
git push
So let’s say you’ve been working on a project, managing it with git locally. Now you want to share it with a friend, or the world. Log into GitHub and create a new repository. GitHub will give you a public clone URL (for others wanting to download your project) and a personal clone URL (for yourself).
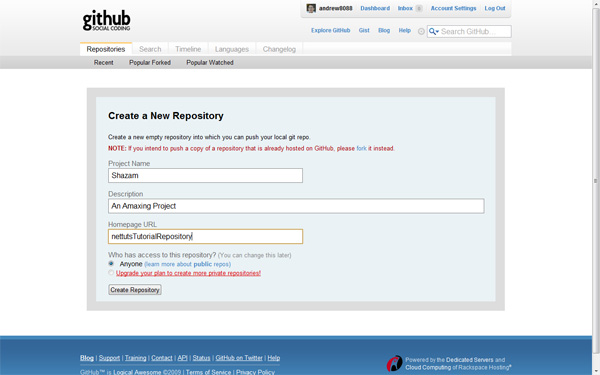
Then, come back to your project in the terminal and give this a whirl:
- git remote add origin git@github.com:andrew8088/Shazam.git
A remote is a project repository in a remote location. In this case, we’re giving this remote a name of origin, and handing it our private clone URL. (Obviously, you will have to substitute my URL for your own.) Now that the project knows where it’s going . . .
- git push origin master

This pushes the master branch to the origin remote. Now you’re project is available to the world! Head back to your project page and see your project.

git pull
You might be on the other end of a project: you’re a contributor instead of the owner. When the owner pushes a new commit to the repository, you can use git pull to get the updates. Git pull is actually a combo tool: it runs git fetch (getting the changes) and git merge (merging them with your current copy).
- git pull
You’re Set!
Well, there’s so much more you can learn about Git; hopefully you’ve learned enough commands to help you manage your next project more smartly. But don’t stop here; check out these resources to become a Git master!
